 Teamviewer
PS Cashbook
Set up for Asset Depreciation
Summary
How do I depreciate assets to show in the assets and liabilities report?
Detailed Description
An asset such as your company vehicle or company furniture and equipment, deteriorates and loses value each year, and recording this can benefit you. The allocation of cost of an asset over its effective life is called depreciation. It is a business expense, but it is a non-cash transaction, and it is often effectively a tax write-off, i.e. a person/company usually may reduce his/her/its taxable income by the amount of the depreciation on the asset.
- Click on the following ATO website link: Depreciating assets, for further information.
- There are two methods you can use to calculate asset depreciation.
- Prime Cost - used to depreciated assets by equal amounts each year over its effective life.
- Diminishing Value - uses a percentage to calculate depreciation. (i.e. the value of a depreciating asset decreases more it the early years of its effective life.)
- Click on the following ATO website link: Prime cost and diminishing value methods for further information.
Note: It is strongly advised you contact your accountant for help in calculating depreciation amounts and which method you should use. Your accountant can look at how your business operates to determine which method is appropriate. Also consult your accountant as to when to depreciate your assets, e.g. at the end of the financial year.
Once setup correctly, Cashbook automatically calculates depreciation, which is recorded as a journal entry.
For example: Your company or business has purchased a motor vehicle, which is a depreciable asset. You need to create the appropriate accounts.
Step 1 - Create an asset account:
- Click on Chart toolbar icon.
- Click on the Assets tab. (Take note of the account codes for assets.)
- Click on the Add button.
- Account Code - This account be in the same range of numbers as other asset accounts.
- Description - e.g. Motor Vehicles
- Account Type - Asset.
- GST Category - 08. Capital Acquisitions.
- Click on the OK button to save.
- For example:

Step 2 - Create a depreciation asset account:
- Click on the Add button.
- Account Code - This account should appear directly underneath its related asset account. i.e. choose the consecutive number.
- Description - e.g. Motor Vehicles-Accum Dep'n.
- Account Type - Asset.
- GST Category - 10. Non-reportable Payments.
- Click on OK button to save.
- For example:

This is how these asset accounts will appear in your Chart of Accounts:

Step 3 - Create a depreciation expense account:
In Chart, click on the Expenses tab.
- Click on the Add button.
- Account Code - This account be in the same range of numbers as other expense accounts.
- Description - Depreciation.
- Account Type - Operating Expense.
- GST Category - 10. Non-reportable Payments.
- Tick the Non-Cashbook Account check box.
- Register Link select Fixed Assets.
- Click on the OK button to save.
- For example:

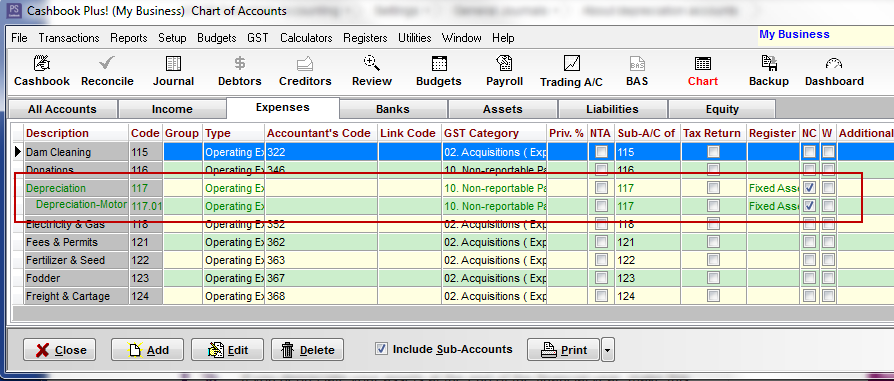
Depreciation can be recorded for numerous/different fixed assets, so it is advisable to create depreciation sub-accounts for each category:
- Click on the Add button.
- Account Code - eg. 117.01
- Tick the Sub-Account of check box.
- Add the header account number eg. 117
- Description - Depreciation-Motor Vehicles.
- Account Type - Operating Expense.
- GST Category - 10. Non-reportable Payments.
- Tick the Non-Cashbook Account check box.
- Register Link select Fixed Assets.
- Click on the OK button to save.
- For example:

This is how your depreciation accounts will appear in your Chart. (Note: these accounts are green because they have been linked to the Fixed Asset Register.)
Step 4 - Create a asset purchase account.
In Chart, click on the Expenses tab.
- Click on the Add button.
- Account Code - This account be in the same range of numbers as other expense accounts.
- Description - Purchase-Motor Vehicles.
- Account Type - Other Expense.
- GST Category - 08. Capital Acquisitions..
- Register Link select Fixed Assets.
- Balance Sheet Link select related Asset account - 412 Motor Vehicles.
- Click on the OK button to save.
- For example:

The following example is a basic asset purchased for cash transaction. (The accounts that an asset purchase affects in your records and on your balance sheet depends on how you finance the purchase.)
Click on the following link for step-by-step instructions on how to setup a loan account to finance an asset purchase.
Step A.
- Click on the Cashbook toolbar icon.
- Click on the Add button.
- Fill in the details, as you would for any other payment transaction.
- The Gross Amount of this transaction is the amount leaving your bank account in payment for the asset.
- In the dissections, for the asset itself, i.e. the motor vehicle, choose the asset expense code and enter the amount that you paid purely for the asset. i.e. you would enter the amount for the actual motor vehicle not including extras such as registration, insurance, fees, shipping, delivery, installation and warranty.
- Note: This account will appear in green as it is linked to the Fixed Asset Register (Level 4).
- For any other expenses incurrred as part of the purchase e.g. registration, insurance, etc., enter these as separate dissections, allocating them to the appropriate expense account codes, until the sum of all the dissections matches the Gross Amount. (i.e. the Unallocated amount is zero).
- Note: If you are on Level 4 you can add the asset to the Fixed Assets Register by clicking on the F icon at the end of the Note (Optional) section. See Step B. on how to do this.
- Click on the OK button once all the infomation is entered.
You have now set a value for your asset.

Step B.
NOTE: Adding an item to the Fixed Asset Register is only applicable to those on Level 4.
- Click on the F icon in the Note (Optional) section, to add the asset being purchased to the Fixed Asset Register.
- In the Assets Register window that opens, click on the Add button.

In the Add a new Asset window that opens, enter:
- Group - select from drop-down list. (You can add a new Group by clicking on the Plus (+) button.)
- Description of the asset.
- Serial No./Ref. - optional.
- Comment - optional.
- Location - optional.
- Current Value - is the cost of the asset EXCLUDING GST.
- Date - date of purchase.
- Cost - is the cost of the asset excluding GST.
- Purchase From - who you purchase the asset from.
- Value for Depreciation - this will normally be the same a the Cost of the asset.
- Date for Depreciation - date from which depreciation is calculated - this will normally be the same as the purchase date.
- Depreciation Rate%, Private Use % and Depreciation Method - ASK YOUR ACCOUNTANT.
- Click on the OK button to save.
Note: The sections coloured Red must have information entered in them. The other sections are optional.
