 Teamviewer
PS Cashbook
Import Bank Statement from a File
Summary
How do I import my bank statement from a bank file?
Detailed Description
This function is designed to save time in entering and reconciling bank account transactions.
Step A.
Before using the import function, you will need to export the bank statement/transaction file (in CSV format) from your bank for the relevant bank account/s and date ranges, and save it to a convenient location on your computer, USB, or memory card etc.
A CSV is comma separated values file, which allows data to be saved in a table structured format. CSVs looks like any spreadsheet but with a .csv extension. Most bank exports will allow you to select this format when exporting transactions. If you are unsure if you have the correct file, that will come to light as you go through the import process - the information displayed will not make sense if you have the wrong format.
Step B.
- Click on the Transactions > Import Bank Statement From File menu option.

Step C.
The Import Bank Statement window below will appear. Work your way through each of the steps on that window:
- Step 1. Select bank ... : Select the bank account you will be importing the bank statement/transactions file into.
- Step 2. Select date period ... : If you want to restrict incoming transactions to a specific date range, enter the dates, otherwise ensure Include all dates is ticked.
- Step 3. Select the file to import ... : Select the bank statement/transaction file to import. (ie. the file you downloaded from your bank and saved to a convenient location.)
- Step 4. Select the layout to use ... : If this is your first time using the Import Bank Statement option, the default layout <Create New Layout> will be used, otherwise select one from the drop-down menu.
- Note: The layout tells Cashbook what type of information is contained in each of the incoming columns in the selected file.
- Click on the Next button.

Step D.
- Step 4 continued. Set/Check import file details ... :
- If you had selected the <Create New Layout> layout option, the information in the selected bank statement/transaction file will appear. You then need to tell Cashbook what is represented in each column.
- Click on the Show Setup button. (top right corner)

Step E.
- Step 4 Continued. Set/Check import file details ... :
- This screen allows the order (column no.) of each data field in the file to be specified. In the Bank Statement Import Setup window match the import fields with column numbers.
- Note: In the Bank Statement Import Setup window the imported bank statement file can be view at the bottom of the window in the File Preview ... section. At the top of each column there is a column number. e.g. 1-Date, 2-Debit/Credit, 3, ... Match these column numbers to the Column No. in the Field to import ... section above.
- For this example:
- the dates of the transactions are located in the first column - tick Date box and set Column No. to 1. (Click on the up or down arrow to select column number.)
- the transaction amounts are located in the second column - tick Transaction Amounts box, click on the Combined debit/credit fields radio dial, set Column No. to 2, with Debit amounts are 'Negative amounts'.
- For amounts, you will need to indicate if debits and credits are in the same column (i.e. Combined debit/credit fields) or in separate columns for debits and credits (i.e. Separate fields).
- If you tick Combined debit/credit fields, you must selected how Debit amounts are identified. (i.e. Negative amounts or Positive amounts)
- the descriptions of the transactions are located in the sixrth column - tick Description box, set Column No. to 6.
- Note: If there are rows at the top or the bottom of the data that do not represent valid transactions, tick the Header rows are present and/or Footer rows are present and select how many rows should be ignored.
- Note: You can specify a default reference, for any transactions that do not have a specific reference.
- Click on the Save Layout button and give the layout a name. This layout can then be selected next time you import data for this selected bank. You should then be able to ignore Step 4.
- Enter the name of you layout:

- Click on the OK button to save.
- Click on the Next button to continue.

Step F.
Step 5. Finalise the imported bank statement ... :
- This screen displays transactions from the imported bank statement/transaction file again with correct column headings.
- This Screen is used to set up information for automatic account allocations.
Note: If this screen is blank, please go Back to Step C (Step 2. Select date period ... ) and ensure the dates selected are correct (or simply tick Include all dates).
If the Customer/Supplier column is empty, you can either:
- Leave it blank, and assign the customer/supplier as the transaction is processed. OR
- Enter a Customer/Supplier by clicking on the transaction to highlight. In the Customer/Supplier column, either:
- Select a customer or supplier from the dropdown menu by clicking on the down arrow
 .
. - Add a new customer or supplier by clicking on the
 button.
 - Type in some text sufficient for you to determine the destination of a payment or source of a receipt. In this situation this description is not on file and is not on your list customers or suppliers. (Note. This can also be a quick way of finding a Customer/Supplier in the drop down list.)
- Select a customer or supplier from the dropdown menu by clicking on the down arrow

Add a Link between bank statement descriptions and a particular supplier/customer:
- This means for example, if you add a link 'TLS', any bank statement record whose description contains the text TLS (case sensitive) will automatically link to this supplier/customer (ie. Telstra Corportation Limited) during the next bank statement import.

- Click on the Link button. (This will take you to the Bank Statement Link tab/section in the Edit Customer/Supplier window for that particular customer or supplier.)
- Click on the Add Link button.
- The bank statement import description for this transaction will be displayed in this window.
- Select the portion of that text you think will always be part of this recurring transaction. For this example we have a Telstra dividend deposit. TLS (ie. the ASX share code) is unique to this transaction.
- Type in TLS next to 'Match Text'.

- Click on the OK button to add text link.
- Click on the OK button to save.
Note: Linking customers/suppliers to consistent portions of incoming transaction description will greatly reduce the time to process subsequent imports, as each customer/supplier can be assigned a default account and enterprise, which eliminates the need to enter any of this information as each transaction is processed.
Note: If required, tick the 'Ignore' checkbox (right click) to force the system to not include this transaction in the finalisation process.
Step G.
- When you are satisfied with the account allocation, click the Process button.
- Click Yes to the Confirm message: ' This routine will take you through all transaction not ticked as "Ignore" and allow you to match, ignore or add each one. Do you want to proceed?,
- Each transaction will appear via the 'Add Transactions' window, in succession.
- If all details are correct and you have added a note if required, click OK to add that transaction to Cashbook and continue to the next one.
- Click Yes to the Confirm message: 'Do you want to link "Telstra Corporation Limited" to "Telstra Corporation Limited" for future bank statement imports?' (Note: This message will not appear for those transactions that have not been linked to a listed Customer or Supplier).
Matching Transactions:
- If an incoming bank statement transaction appears to match a transaction already entered into Cashbook, that transaction will automatically appear:
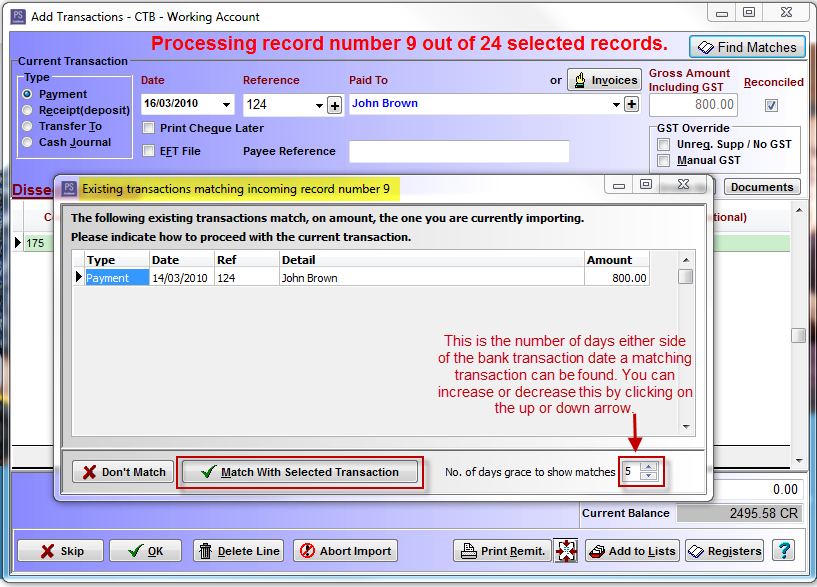
- Click Match With Selected Transaction if this is a match.
- Click Yes to Confirm message: 'Reconcile selected transaction recording an amount of 800.00 for "John Brown"?'.
- This will take you to the next transaction.
- If not a match, click Don't Match and add the transaction the normal way.
Find Matches:
- If you believe there is a matching cashbook transaction for a bank statement transaction but it does not automatically appear, click on the Find Matches button located at the top right hand corner of the Add Transactions window.
- In the Existing transactions matching incoming record number ... window, go to the No. of days grace to show matches box and click on the up arrow to increase the number of days, until the matching transation appears.
- Continue as above.
Transfers between your bank accounts:
- For transaction that are transfer between your bank accounts, select Transfer to in the Add Transaction window, then in the To Bank box, selected the correct bank from the drop down menu.
- Click OK to save.
Step H.
- When all transaction have been process:
- Click Yes to Confirm message: 'Would you like to reconcile the imported statement?'
- This will take you to the reconciliation screen for that bank account.
- Reconcile as normal.
- Click here for link to: How do I reconcile a bank account?