 Teamviewer
PS Cashbook
Bank Feeds Statement Import - Bank Feeds Processing
Summary
How do I process transactions already imported automatically via PS Bank Feeds?
Detailed Description
Processing Imported Bank Transactions
Once you have successfully completed the PS Bank Feeds setup requirements, your transactions for the requested banks will start to flow into your Cashbook each time you open it. These transactions can be made visible and processed via the following steps:
Step 1 - show imported transaction list
- Click on Transactions > Bank Feed Import menu option. (Note. If you ticked the Automate Bank Statement Import On Startup box in the Setup > Bank Feed Setup > General window, you will automatically be taken to this window upon opening your Cashbook program.)
- If you have only one bank account enabled for Bank Feed processing, you will automatically go to a list of transactions containing all unprocessed imported bank transactions (up to the Reconcile To date) and all existing unreconciled Cashbook transactions, for that bank.
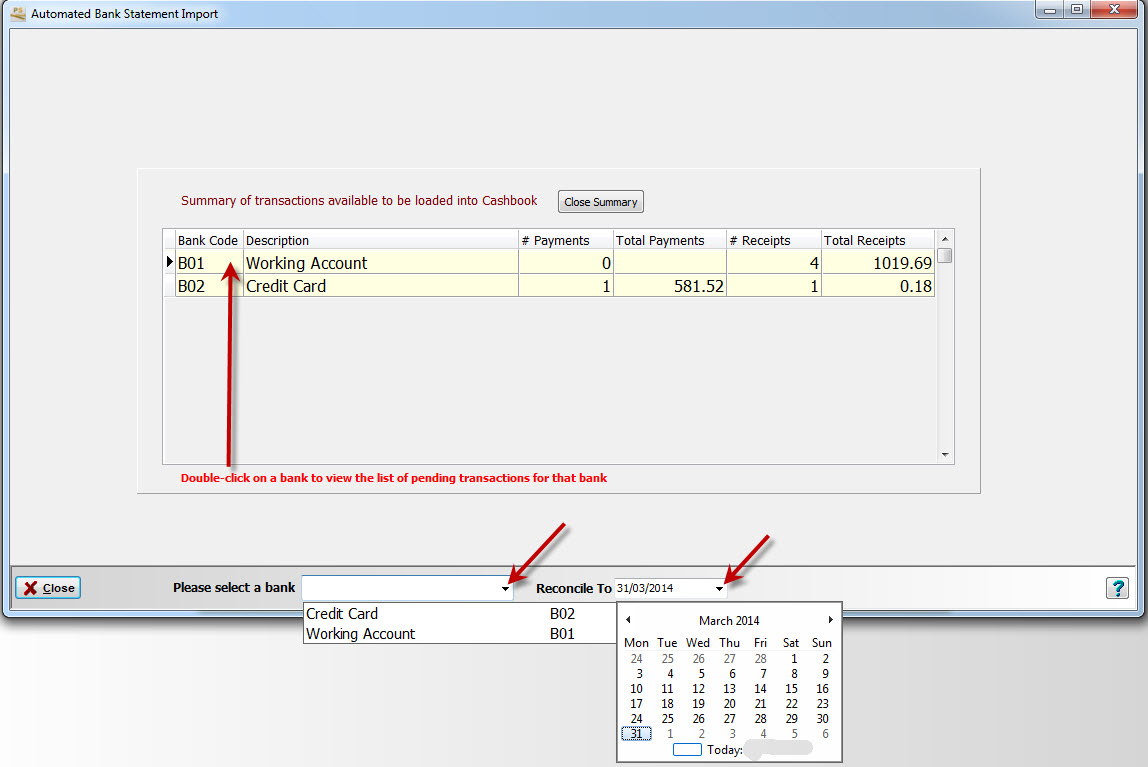
- If you have more than one bank account enabled for Data Feed processing, you will be taken to the Summary of transactions available to be loaded into Cashbook page. This page will show each bank account enabled for Datafeed processing and the number and total dollar value of payments and receipts transactions imported, for each.
- There are 2 methods of selecting a bank account to view the list of pending transactions
- Double-click on the bank.
- Click on the down arrow next to the Please select a bank window at the bottom of the screen, and select the bank.
- There are 2 methods of selecting a bank account to view the list of pending transactions
Note: remember to click on the down arrow next to the Reconcile To window and select the date you want to reconcile to. If the list of transactions is already displayed when you change this date, the list will be re-built.
- When a bank has been selected via the dropdown list, you will be prompted with the following message (using the relevant bank description);
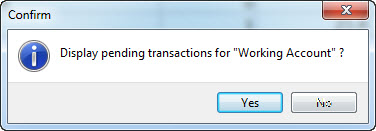
- Click on the Yes button.
- A progress bar will track both the building of the imported transactions, and any outstanding Cashbook transactions (unreconciled for the requested bank)
- You may receive a message reporting a difference between the imported closing balance (as set by the bank) and the calculated closing statement balance. Take note of the balances and click on the OK button. You can reproduce this error by clicking on the Error: Bank Balance Mismatch error line just below the Closing Statement Balance caption:

Note:
- The Close Summary button closes the Bank Summary window (see next point)
- The Bank Summary button shows a summary of all banks linked to a data feed, and the number/value of receipts/payments for each.
Step 2 - process the displayed transactions
- Your screen should now display:
- a list of all unprocessed imported transactions dated up to the Reconcile To date. The date will be calculated from your last reconciliation for the selected bank, based on the reconciliation frequency set for the bank. You can set that date to whatever you wish, as long as it is after the most recent reconciliation. This type of transaction will be recognized by the presence of a left-hand and a right-hand column.
- The left-hand column shows the imported information
- The right-hand column shows Cashbook's best attempt to match to an existing transaction, create a new one or determine that the transaction is a bank transfer. These matches/transfers/creations will only take affect when you click on the Record button.
- all existing unreconciled Cashbook transactions. These only show in the right-hand column.
- a list of all unprocessed imported transactions dated up to the Reconcile To date. The date will be calculated from your last reconciliation for the selected bank, based on the reconciliation frequency set for the bank. You can set that date to whatever you wish, as long as it is after the most recent reconciliation. This type of transaction will be recognized by the presence of a left-hand and a right-hand column.
- Note that each imported transaction will either show a green tick
 (the transaction passes all new transaction checks) or a red cross
  (transaction checks not passed).
 - You can make any changes you require and then close the window, if you need to resume the processing at a later time. Just make sure you answer "yes" to the prompt about saving the data when you do close the window. Remember - no new cashbook transactions are created, or existing ones modified (via a match) until you click on the Record button.
There are 3 tabs to help you process a transaction correctly:
- If you suspect that an incoming transaction should match to an existing transaction, click on the Match tab and then click on the Find Matches button. You can alter the No. of days grace to show matches to broaden the date range, if need be. The last-used 'days grace' will be used for future matches until that number of days is changed.
- Click on the up arrow
 to increase the number of days.
 - Click on the down arrow
 to reduce the number of days.
 - An example for the need to increase the 'days grace':
-
A cheque was written on the 05/03/2014 and entered into Cashbook. The cheque was not presented until 16/03/2014. ie 16 days difference. In order to accommodate this date difference, the No. of days grace to show matches can be changed by clicking on the up arrow to increase the date range. Similarly, click on the down arrow to decrease.
-
- Transactions are "matched" via Amount and Date. It is common for the date to be different by a few days (eg. cheques to clear and overnight processing for EFTPOS transactions), so the software allows (by default) for a 5 days grace when matching via amount.
- To match the imported transaction to one or more Cashbook transactions, tick the Matched box for each relevant transaction. When the total of the ticked transactions matches the amount of the incoming transaction, the Unallocated total will show as '$0.00' . At this point the OK button will be enabled.
- Click on the OK button to save the match. Click on Unmatch button if you want to remove matches for an incoming transaction. Click on the Cancel button if you want to exit the matching process without saving any changes.
- A matched transaction will be marked with a green tick indicating it is cleared for reconciliation, with data from the existing Cashbook transaction displayed on the Match tab, if a match has only been made to a single transaction.
- Cashbook will automatically attempt to match an imported bank transaction (up to the Reconcile To date) with an existing unreconciled Cashbook transactions in the current company and bank.


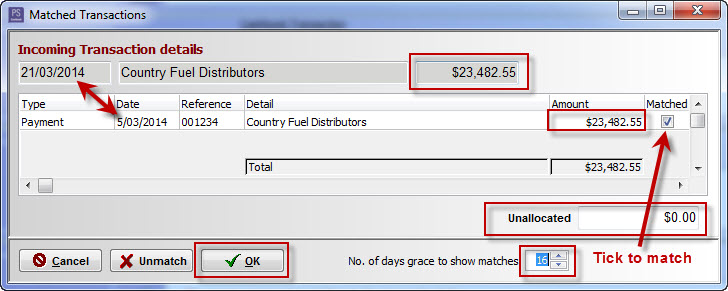
- When the above transactions are matched, the Cashbook transaction(s) should be removed from the list of Cashbook transactions below and the matched transaction should look something like:

Create tab
- This enables you to create a new transaction using the information available from each incoming transaction, plus whatever other information you may need to complete the transaction.
- There are 5 ways to nominate a Customer/Supplier: (see Examples 1-5 below)
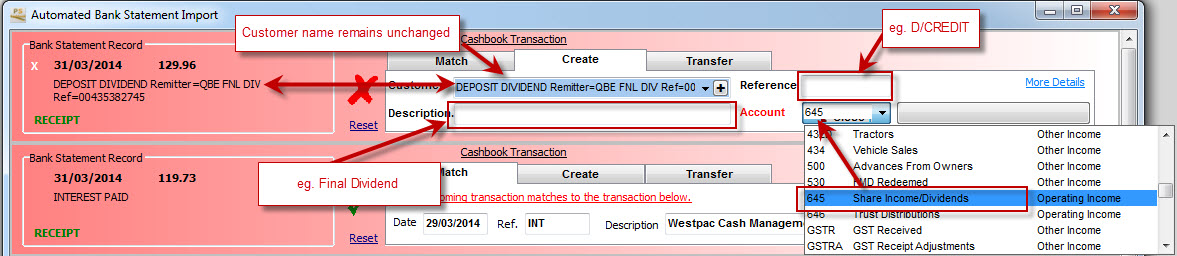
- Accepting the imported bank transaction description for a Customer/Supplier. You will then need to manually add other details (eg. Reference, Description, Account).
- Entering your own Customer/Supplier description (this will not add this to the Customer or Supplier list). You will then need to manually add other details (eg. Reference, Description, Account). If you do wish to add this to the Customer/Supplier list, click on the
 button. (Note: It is preferrable to add a default Reference and Acccount at this stage.)
 - Add a new Customer and Supplier by clicking on the
 button. (Note: It is preferrable to add a default Reference and Acccount at this stage.)
 - Select a Customer or Supplier from the drop-down list by clicking on the
 button.
 - Automatic selection due to linkages previously set up - see next point.
Example 1: Accepting the imported bank transaction description for a Customer/Supplier. You will then need to manually add other details (eg. Reference, Description, Account).
(Note: Setting up a Customer and Supplier name, allocating Defaults such as Reference and Account will speed up this importing process.)
Example 2: Entering your own Customer/Supplier description (this will not add this to the Customer or Supplier list). You will then need to manually add other details (eg. Reference, Description, Account).

Example 3: Add a new Customer and Supplier by clicking on the button.

Example 4: Select a Customer or Supplier from the drop-down list by clicking on the button.

- If you have selected an existing customer/supplier, the
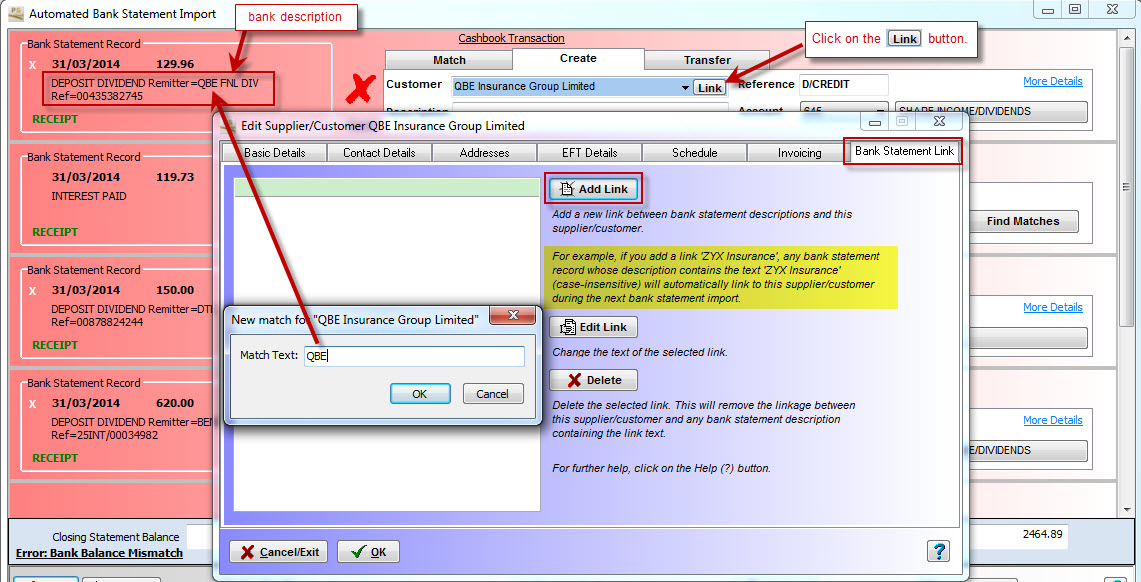
 button will become visible. This enables you to link bank statement transaction descriptions to the selected customer/supplier. Each link must be unique and unambiguous to prevent conflict. For example, if you add a link "ZYX Insurance", any bank statement transaction whose description contains the text "ZYX Insurance" (not case-sensitive) will automatically link to this customer/supplier during the next bank import. An example of how to set up a link between a bank description and a customer/supplier is shown below.
- An example of setting up a link between a bank description and a customer/supplier. The following window (or similar) will appear after you click on the Link button in the transaction import. In this example, 'QBE' has been set up as a link for the QBE Insurance Group Ltd. After this link has been assigned, and transaction coming in with the text 'QBE' anywhere in the description will automatically be assigned to QBE Insurance Group Ltd as the supplier/customer, and will use the default reference and account assigned to that supplier/customer. If you had another customer/supplier which also had 'QBE' in the description, you would need to qualify 'QBE' further e.g. extend to 'QBE INSURANCE', until it becomes unique. Note that you can't have one supplier/customer linked via 'QBE' and another linked by 'QBE INSURANCE', as both would be matched via just 'QBE'.
Example 5: Automatic selection due to linkages previously set up.

OTHER INFORMATION:
- Reference e.g. BPAY, EFT, DEPOSIT, D/CREDIT, D/DEBIT, FEE.
- Description - This is only relevant if you have (or will create) 1 dissection line for the transaction. It is a note pertaining to the transaction eg. Invoice Number, what you have purchase or sold, and will be saved with the dissection of the resulting transaction.
- Account - This is only relevant if you have (or will create) 1 dissection line for the transaction. If you select a customer/supplier with a default account, this will be used to prefill the Account. Alternatively, if you have set up PS Data Feed with a default expense/receipt account, this may be used to prefill the account. Otherwise select an item from your Chart of Accounts. Depending on your account selection preference (via the Setup > Settings menu option, using the Transactions tab), you can select an account either by code or description.
- More Details - click on this blue link to see what the transaction would look like so far if you had entered it directly via the cashbook transacion listing. This is handy in the following circumstances:
- You are getting a red cross against the transaction and you can't see why. In this instance, click on More Details and then click on the OK button. You will then see what errors are generated.
- You want to link the transaction to existing invoices.
- You want to dissect the transaction further than the default method allows.
- Any other situation where you need the full power of the normal Add Transaction window.
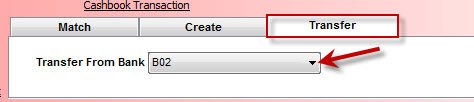
Transfer tab - this is used when an imported bank transaction is a transfer between company bank accounts.
- if Cashbook can find another unprocessed imported transaction for the same amount on the same day in a different bank, in the opposite direction (e.g. if this transaction is a payment, the other transaction must be a receipt), it will automatically allocate the current transaction as a transfer. If the current transaction is a payment, the transfer will be marked as a Transfer To the other bank, otherwise a Transfer From the other bank.
- If not automatically assigned as a transfer, click on the drop-down list of banks and select the bank you wish to transfer money to or from.
The Balance Line
The balance line appears at the bottom of the transaction list, as follows:

- .Closing Statement Balance - this figure is calculated as:
- if there are previous reconciliations for the selected bank, the most recent reconciled balance PLUS new imported receipts LESS new imported payments, OR
- if there are no previous reconciliations for the selected bank, the calculated closing balance at the start of the year (opening balance + brought-forward payments - brought-forward receipts) PLUS new imported receipts LESS new imported payments
- Error: Bank Balance Mismatch - this error will appear if the imported closing balance (as passed on by the bank) does not equal the displayed Closing Statement Balance. Click on this error to see the two figures.
- Reconciled Balance -
- if there are previous reconciliations for the selected bank, the most recent reconciled balance PLUS new imported receipts that have a green tick beside them LESS new imported payments that have a green tick beside them, OR
- if there are no previous reconciliations for the selected bank, the calculated closing balance at the start of the year (opening balance + brought-forward payments - brought-forward receipts) PLUS new imported receipts that have a green tick beside them LESS new imported payments that have a green tick beside them.
- Unreconciled items - the sum of outstanding cashbook payments LESS the sum of outstanding cashbook receipts.
- Cashbook Balance - the Reconciled Balance LESS Unreconciled items
Other Group Options
Refer to the following screen shot:

- The Close button. If there are any un-processed transactions, you will be asked if you want to save any changes you have made. You should always answer "Yes" unless:
- You have not made any changes (in which case saving the data would not hurt anyway), OR
- You have made changes but you do want to save them.
- The Refresh button. This will reload all unprocess imported transactions. You may wish to do this if you have altered some existing cashbook transactions via the More Details link, which may have altered which incoming transactions are matched to existing ones. Remember to save any changes (if you want to) you have made, when prompted.
- The Please select a bank option. You can use this option to switch between banks. Remember to save any changes (if you want to) you have made, when prompted.
- The Reconcile To date. When a bank is selected, either manually or automatically, a reconciliation date will be calculated based on the last reconciliation for the bank and the frequency of reconciliation set for that bank. You can change the date if desired, but not prior to the beginning of the year or the most recent reconciliation. If transactions are displayed at the time of changing the date, they will be reloaded.
- The Print B/S button. This will print a bank statement, with a running balance based on the imported transactions.
- The Banks Summary button. THis will give you a summary of transactions available for import for each bank with an assigned datafeed. Refer to usage in Step 1 above.
-
The Record button. This will only be visible if the Closing Statement Balance = the Reconciled Balance and the Reconcile To date is not after the end of the financial year. Click on this button if you want to process all the imported transactions with a green tick. Once you click on this button, you will be presented with a screen similar to the following:

- If you want to view the reconciliation after saving all the transactions, ensure that Print reconciliation after saving is ticked.
- Click on the Cancel button if you need to change the reconciliation date.
- Click on the Save button to continue. You have now finalised the import of data for the current bank.
.